
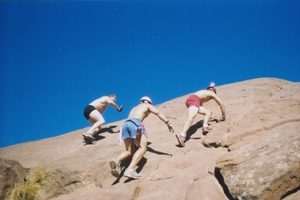
Hiking Camelback is a great recreational activity but can also be a very serious workout. The extreme incline and rugged terrain provide the perfect setting for good cardio, core and leg development.
I’ve personally used Camelback as an addition to a weight training routine to increase cardiovascular development, trim body fat and improve overall athletic performance. For three years (2006-2009) in a row, adding a Camelback hike 1-2 times per week, helped me cut 10-25 pounds of body fat after a winter bulking season. I might add that this only takes between 3-6 weeks to do. I no longer bulk in the winter but the principle is still the same for utilizing either Echo Canyon or Cholla Trail as a way to lose weight and tone up.
However simply attacking the task haphazardly will not yield the same results as an organized approach. There are few important vital behaviors to remember when utilizing Camelback as a workout. Below are the top 5 tips for implementing a workout strategy via Camelback Hiking listed by order of importance.
Workout Tip #1 – Keep Track and Set Goals
By far the most important element to making Camelback an effective workout is to keep track of your times and set goals for improvement. While hiking for fun is fine, I true champion looking to improve will always keep a scoreboard on their performance. It does not matter how fast or slow you are or how many stops you take while ascending to the top. The goal is to improve and push your body so that it will be more difficult each time and you will grow both physically and mentally.
I am personally not very fast on the mountain compared to many of my friends who can blaze up and down Echo Canyon, but every time I go I keep track of my times so that I can measure my overall physical performance improvement. Tracking consistently is more important than specifically how you track it. I personally track start time, time up, time down and end time. This gives me the ability to see the time of day I hiked as well as figure out how long I rested at the top. I write these down in a book at the mountain and then keep them organized in a spreadsheet on my computer. I also like to track my body weight, the temperature outside, weather conditions (i.e. sunny, windy, overcast) and any energy supplements I took prior to hiking.
Keeping track however is not enough because without a goal I find it hard to acquire the motivation to get better. A good start is to have the goal to beat your last time, however a better goal is after the first time you hike set a goal that will force you to improve by a certain increment every time you hike. For example, if the first time you hike, you make it up in 40 minutes. Set the goal to get up in 35 minutes within 10 weeks. If you are hiking once a week all you have to do is improve your time by 30 seconds each week.
What this does is break down the improvement into manageable increments. Decreasing your time by 5 minutes all at once may seem like an insurmountable feat. However just 30 seconds may be simply going a little harder at the last quarter mile. This is why I also recommend you utilize a stop watch that you carry with you while you hike That way you can quickly look at it. It doesn’t matter if its hung around your neck, on your watch or ipod / cell phone.
By keeping track of your times and setting goals for improvement you will effectively increase the effort you put out each time you hike, burn more fat and get a better workout. On top of this it makes for a fun game where you get to compete against yourself and the clock. Also don’t beat yourself up if don’t beat your time one week. Instead use this as a teachable moment to get better for next week. Also use your most recent time even if it’s not your best because it is your most current performance level. This will help accurately reset the bar each time and give you confidence to meet your goals.
Workout Tip #2 – Take a Recovery Drink and Hydrate
 This is a commonly overlooked important element to utilizing a Camelback hike as an effective fat burner and muscle builder. Camelback is a strenuous hike that will burn several hundred calories or more depending on your fitness level. It also takes anywhere from 45 minutes to an hour and a half to complete.
Depending on the individual somewhere between 45 minutes to an hour and 15 of exercise, the body begins to go into starvation mode. Prior to this your body burns fat and glycogen (carbs) for simplicity at a 50:50 ratio. As your glycogen levels lower, your body burns more and more fat. After an extended period of time however, your body will begin to believe you are starving and release cortisol which is a fat retaining hormone. At this point your body will turn to muscle tissue to get energy. This means that if you don’t get in calories during this period your body can catabolize muscle.
After a workout, especially Camelback, it is important to ingest calories to help stop this process and recover. Most people believe protein is the best solution for this, however the better alternative is to get carbs into your system to help replenish glycogen stores. Once your energy stores stabilize it is then time to ingest protein.
What is the Right type of Carb?
A liquefied complex carb is the best however any high glycemic carb will do. What this means is that natural sugar such as what is found in fruit or white rice is the best. However a Gatorade or other fruit drink is a decent alternative. Eating a slow burning complex carb such as bread would not be the best choice. An easy alternative is to get a recovery drink formula in powder form. These are easy to store and won’t go bad in the summer heat.
It won’t cover this too deeply because there are already a lot of other articles on it. But hydration is also very important because muscle synthesis and fat burning requires the lubrication of water in order to take place. The more appropriately hydrated you are during your hike the better you will build muscle and burn fat. Once you feel thirsty you are already dehydrated. For this reason its good practice to set certain points during when you take a sip to help regiment water intake. For those who have low body fat or are worried about losing muscle mass it may be a good idea to carb load during the hike. This means that the hiker should drink a carb supplement while hiking along with water.
Workout Tip #3 – Make it Part of a Weekly Routine
While there are people who hike Camelback every day, for many people this is not feasible. It also may be counteractive to your fitness goals especially if you are looking to build muscle mass. It is a good idea to add Camelback to an existing weight training, CrossFit, running or other physical routine. An aggressive example would be to work out Monday and Tuesday, hike Wednesday, workout Thursday and Friday, hike Saturday and take Sunday off. A more moderate example would be to hike Saturday and workout Mon, Wed and Fri.
Workout Tip #4 – Pick Consistent Days and Times
It is good practice to pick consistent days and times to hike Camelback. This will help get you in the routine so that you do not miss the hike but also allow you to more accurately track changes. I personally like to hike Camelback twice per week, one day during the week after work and then either Saturday or Sunday morning / mid-day.
 Workout Tip #5 – Hike With a Workout Partner
By Hiking with a partner you not only have someone who can help hold you accountable but someone you can have a little friendly competition with. A workout partner is always a good idea plus it is someone you can carpool with.
Hopefully these tips helped you; if you have any specific questions feel free to reach out me directly.
Leave a reply in the comments below if you have any questions.
